Skip navigation

Category Archives: Uncategorized

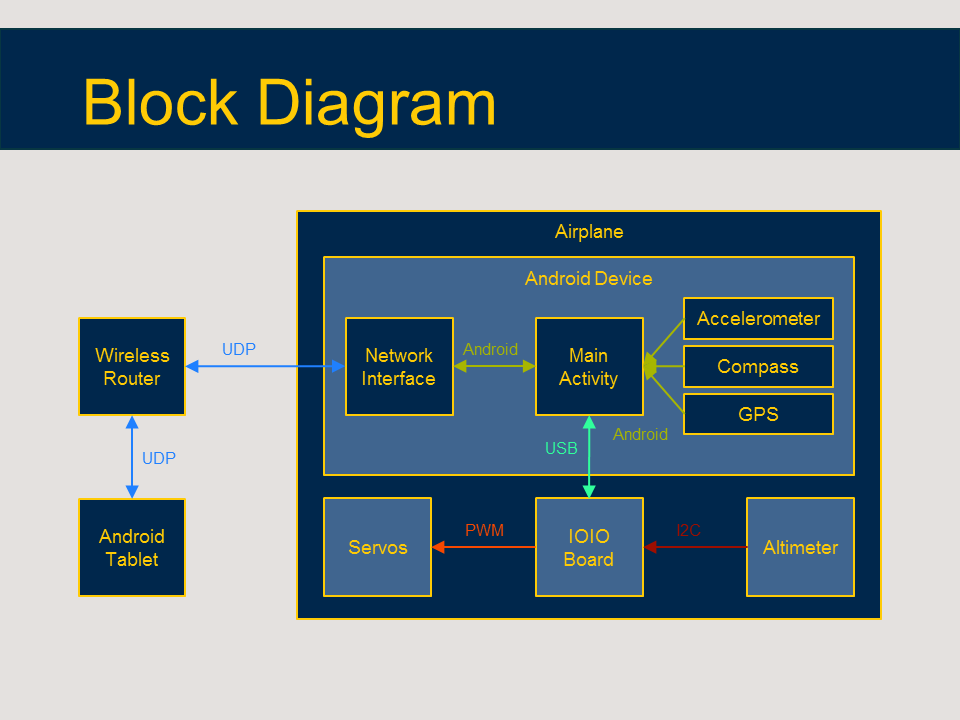
Ok, I should be caught up for now. Before I started making more guitar effect pedals, I wanted to make a power supply for them. Eventually I want to do a kickass pedal board, but I’ll wait until I make a few and get much better at guitar. Anyway, I wanted a supply similar to the Voodoo Lab Pedal Power 2+. That is, 5-10 isolated 9VDC outputs plus a couple AC outlets to power my amp plus something else. Then I found this cool transformer. The Weber WPDLXFMR-2 has eight 11VAC secondaries plus one 9VAC secondary. It has primary windings for 120, 220, and 240VAC. It was perfect for what I wanted to do. I didn’t care about the 220 or 240 primaries or the 9VAC secondary. I just wanted to convert from US mains AC voltage to 9VDC. I plan on making all my pedals after all. Might as well make them use all the same supply voltage.

Power Supply Schematic

Each of my eight 9VDC outputs uses one of the 11VAC secondaries of the transformer. It then goes through a full wave rectifier, a filter cap, a linear voltage regulator, and a fuse. Speaking of fuses, I took a few steps to protect the device. The on switch includes a 15A circuit breaker. Each 9VDC output is fused, plus each voltage regulator has internal thermal protection.

Power Supply In Power Supply Out

I decided on the same input connector as a typical PC power supply or lab instrument so I could use a standard cable of whatever length I wanted. I had a hard time finding what I should use for the outputs. The other end of most DC barrel connectors are just a wall-wart power supply. Therefore, I just did what Voodoo Labs did and used the same barrel connectors. That way I could just buy their cables. I decided on one of the same Hammond enclosures I will be using for most of my pedals. This one is a bit larger though.

This was my first project using KiCAD instead of Eagle for my PCB as well. I liked it. It’s completely open source as well. No limitations. I dig it. I’ll be using it for the next pedals. It’s 3D model generator will make the mechanical design easier as well.

I went all out for this supply. I got a filtered power input. All the outputs are isolated. It’s got two AC outlets. Eventually I would like to make a cheaper one with no isolated outputs, just one 9V bus with a few connectors. A variable voltage output would be cool as well. Then I would see if all that extra cost was really worth it. I imagine the answer is the same as 99% of all other answers in engineering…”It depends”.

I started playing guitar about a year ago. Once I got some of the fundamentals and a few songs down, I wanted to do a guitar project. For the first one, I decided on a distortion pedal. Then I found ElectroSmash. It’s a cool site that analyzes the electronic design of various guitar effects and equipment. I started with their analysis for the Ibanez Tube Screamer. I have heard versions of this pedal before and enjoyed the sound. It is quite popular after all. I finished this project in July 2014.

I mostly followed their schematic with a few adjustments. First, I replaced the complex electronic switch with a simple 3PDT switch, making it a true bypass pedal. Next, I replaced all the antiquated semiconductors and things with modern equivalents. ElectroSmash lists some equivalents right in their analysis. Finally, the big difference is I used mostly surface mount parts. I was really curious how it would sound. Surface mount components are almost always preferred in most electronic design. Audio effects seem to be one of the exceptions. After all, this is a type of distortion effect. That’s usually not a desirable thing. With audio, though, the bottom line is how good it sounds, which isn’t easy to measure. It’s very subjective.

Tube Screamer Clone Circuit Board Tube Screamer Clone Pedal

I designed a PCB, sourced the parts, and put everything together. Since this was my first design, everything attached to the enclosure was attached to the PCB via wire leads and connectors. I wanted to easily be able to take the pedal apart if I something was wrong. Naturally, the pedal worked great, and I didn’t need to take it apart. I bought two PCBs, so I eventually populated the second with the pin headers and soldered the wires from the components directly to the board. It turned out really well. A buddy of mine has a TS808 reissue, and we compared them side by side. They sounded very, very similar. I was quite pleased.

I will make some changes for the next one. I really want to design the PCB such that everything will mount to the enclosure directly from the PCB. That is, I won’t need to mount the PCB to the enclosure with standoffs. It will just be fixed to the pots and connectors and things. Also, I won’t need to wire anything. I just gained access to powder coating equipment, so I want to try that out on the next one.

Well, pretty much forgot I had this site. Just finished a project, so I might as well post the last few. First, I’ll start with my senior design project from school. This project was finished in April 2014. Two friends and myself create an autopilot system for an RC plane using an Android phone. Our abstract:

The project is to create an automatic pilot system for a remote control aircraft utilizing the Android operating system. The plane will be able to be controlled in several ways. The user can control it manually, blend manual with automatic control, or give the system full control over the plane. The user can vary the degree of control with the push of a button in a custom application on an Android tablet. An Android phone that includes most of the necessary hardware components such as an accelerometer, compass, network interface, microprocessor, and GPS will be placed onboard the aircraft.

Connecting the Android phone via a cellular or WiFi network to an Android tablet will enable the user to send commands to the airplane and receive flight data in return. Connected directly to the Android device via USB will be a IOIO-OTG development board, which will allow direct control over the plane’s control surfaces and throttle as well as receiving data from an external altimeter. A custom circuit negotiates whether the plane receives signals from the manual controller or the autopilot system. It can also isolate the autopilot system completely based on user input from the manual controller. In addition, the flight data will be sent to a centralized server where multiple observers can track and record the current flight via a web interface.

This project aims at combining both intelligent software and hardware design to create a unique autopilot system for a remote controlled aircraft.

Block Diagram

The goal was to use to the sensors in the phone in conjunction with development board to make the plane control itself. It could be controlled completely with the RC controller, completely with autopilot, or some degree in between. That is, we set up each control surface to be controlled independently. For example, the pilot could set up the ailerons to level the plane while still controlling the elevator manually. The autopilot commands were sent to the phone via an Android tablet over a WiFi network. A custom, analog circuit negotiated which commands, manual or auto, to send to the control surfaces. It was equipped with a failsafe to revert all controls to manual when activating a toggle switch on the manual controller. A video summary can be viewed here: http://youtu.be/iO2QXoRdCP8.

I recently updated the software with a new colorpicker library I found. Spectrum is a really good jQuery library for picking colors. I’m not sure why I couldn’t find it the first time I looked. Now there is no need for typing in hex codes or having more than one manual set page. It does still let me type in the hex codes if I want though. It even works for mobile.

IMG_0780 IMG_0782

These are now the only two pages I need. It was a good find.

This is my poker table with programmable, digitally addressable, RGB color changing, LEDs with a web interface. I designed the table, the electrical hardware, and did most of the code myself. It uses an Arduino microcontroller, so there was an ample amount of supporting code from the internet. For instance, the LEDs (http://adafruit.com/products/306) I used are digitally addressable and came with a library, so I didn’t have to do all the low level programming for those. However, most of the web programming I borrowed from other projects I had worked on. There weren’t many examples of interfacing the Arduino with a web interface.

The controller is housed in a small HTPC case. I needed an enclosure with enough space to mount my terminal strips, breadboard and connectors, and I needed a power supply capable of 9-12V and 5V, so it worked out. The web pages reside on my small home server. There is a handheld controller that can be used to set all the lights, but after I finished the web app, I realized that wasn’t as fun. I wanted to make a dedicated application on my phone, but decided on the web interface for the cross-platform nature.

It didn’t come out perfectly, but it’s a prototype. Looking back a Raspberry Pi probably would have been a better choice for the controller since I could have embedded the web server. However, the Arduino provided better experience for my Electrical Engineering education. If anyone is working on a project that is similar in any way, let me know if I can help at all!

Later, I finished the regular table top I made to accompany it. After that, I added functionality to choose colors based on hex codes used to pick HTML colors.

The code is located at https://github.com/jrtrzeciak/pokerTable.

ImageImage

Here you can see the table in tournament mode as well as the web interface to go with it.

ImageImage

The result of a few people busting.

ImageImage

Here is the table in manual mode.

ImageImage

Here is the new manual mode where you can pick color codes rather than the 8 colors I hard coded. The color codes are the standard codes used for web programming/styling. A good resource is found at http://www.w3schools.com/tags/ref_colorpicker.asp.

ImageImage

Finally, the table without the lights.